November 30, 2022
Practice Fusion: End-of-Year Cleanup and Review

Operating a medical practice is no small task—which is why it’s so important, when you’re using Practice Fusion, to make sure you use it to its fullest potential. That means regularly taking time to review your electronic health record’s (EHR’s) settings, connections, and other details to confirm they are optimized and up to date.
That’s why we bring you this guide: To help you identify 4 key EHR settings to double-check to make sure Practice Fusion is operating most efficiently and effectively for your practice.
1. Review dashboard tiles for integration opportunities
Billing tile
One of the first places to check for improvement opportunities is your billing system. Are you interested in a new billing system? Do you want to integrate your billing system with one of Practice Fusion’s Billing Partners? (Click here to learn about our current Billing Partners.)
To request integration information for one of our billing partners, click the Dashboard tile within the EHR’s Home section, navigate to the Billing tile, then select Explore billing solutions. Alternatively, you can navigate to Settings (top right of the Practice Fusion screen) and select Billing solutions under the Billing header. This opens a window displaying both billing solutions in Practice Fusion and those with other connected billing partners.
With integrated or fully integrated billing partners, you can request direct contact by verifying your contact information, then selecting Request info.
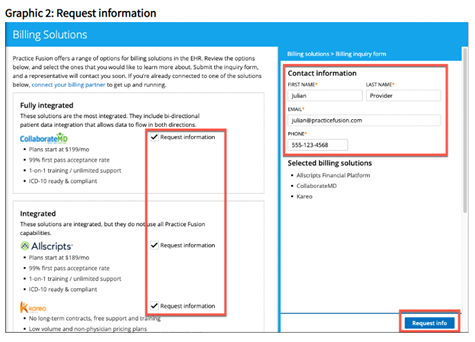
If you’re already integrated with a billing partner, you can connect or update your billing integration:
- Select the Connect your billing partner link (pictured above) to navigate to a new window and enter your account information; or select Account setup from the Settings menu.
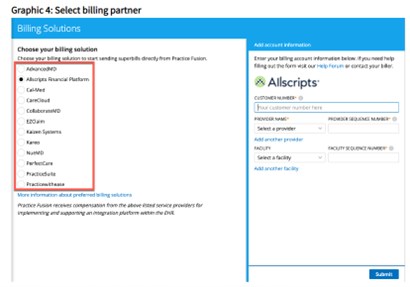
- The next screen will display a list of all connected and integrated billers. Select the appropriate billing solution, fill in account information, and select Submit.
- Note: Account, provider, and facility information is not provided by Practice Fusion but must be provided by the billing solution with which you have contracted.
Already connected? Click here to see what you can do next to optimize your billing integration.
Laboratory and Imaging center tiles
Practice Fusion provides free integration with laboratories and imaging centers nationwide. This allows you to receive lab results and radiology reports directly into your EHR, but only for those laboratories and imaging centers that you have integrated with your EHR. End-of-year is an excellent opportunity to review your connections. Are you signed up with all your desired laboratories and imaging centers? Are you using all of those you are currently signed up with?
To review your existing connections, navigate to Labs and imaging on the Settings page, then select Lab connections for laboratory connections; or navigate to Imaging centers on the Practice Dashboard.
To add a new laboratory partner, select Lab connections under the Labs and imaging header on the Settings page; or, alternatively, click Add your labs on the Labs tile on the Practice dashboard. This opens the Add labs page, where you can search for your desired lab using the Search by field. By default, it searches by zip code, but other search criteria are available as well, including lab name, type of tests performed, availability of electronic results and/or electronic orders, etc.
After locating the desired lab, select the lab name or click the Add button located to the right of lab details.
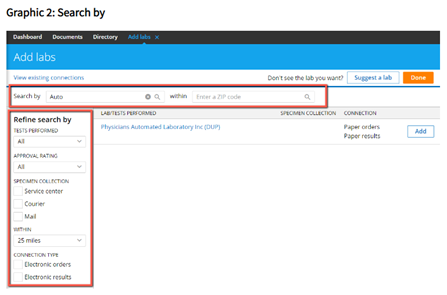
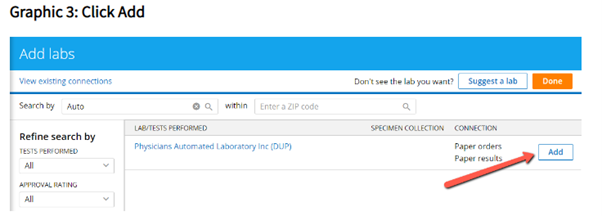
You can also suggest a lab that is not currently connected with Practice Fusion. Follow previous instructions to reach the Add labs page; or select Lab connections under the Labs and imaging header on the Settings page; then click Suggest a lab.

Enter Lab name, Account number, and contact information for a lab representative. Alternatively, have a lab representative reach out directly through the Practice Fusion Partnerships portal.
Connecting to an existing imaging center partner is a similar process: Choose the Imaging centers tile on the Practice dashboard and click Connect imaging centers.
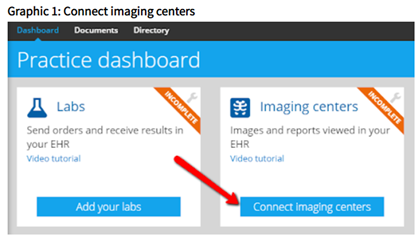
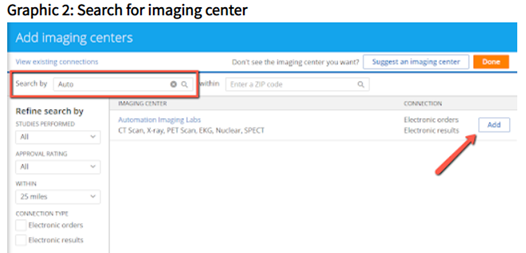
On the Add imaging centers page, search for imaging center by name or zip code. You can refine the search using filters in the left-hand sidebar. When you find the desired location, click the Add button next to the imaging center’s information.
To suggest an imaging center not currently connected with Practice Fusion, select the Imaging centers tile on the Practice dashboard and click Suggest an imaging center. You will need the imaging center name, your account number, and your account representative’s contact information. You can also have your account representative reach out directly through the Partnerships portal.
2. Confirm practice settings are up to date
End-of-year is also a perfect time to review your practice dashboard and make sure details such as practice location, phone number, FAX number, and other contact information are correctly listed.
Facilities information check
To review your currently listed facility or facilities, update an existing facility, or add a new facility, click Settings (upper right) and select Facilities under the Practice settings header. Users with administrator access can update basic facility information such as name, phone number, address, or billing profile by selecting the facility and clicking Edit in either the Facility profile or Billing profile section.

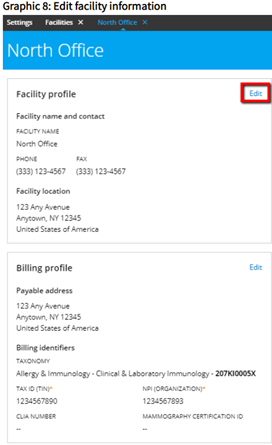
Note: You cannot delete a primary facility from your Practice Fusion account. As a workaround, we suggest changing the facility name to “DO NOT USE” or adding “DO NOT USE” or “INACTIVE” to the current facility name.
Practice details check
An EHR administrator can also edit details such as practice identifiers and the content sources accessed via the Infobutton. Access Practice details under the Practice settings header on the Settings page.
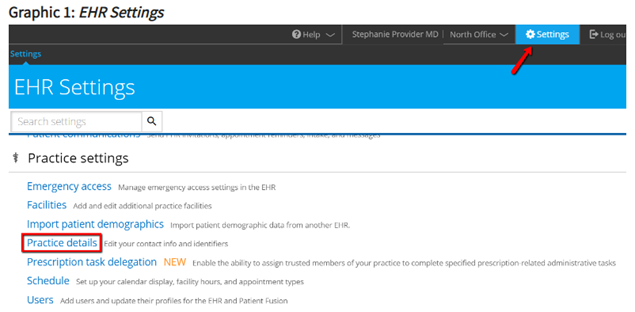
Here your Practice Fusion administrator can edit time zone and daylight savings information as well as practice identifiers such as Practice National Provider Identifiers (NPI), Employer Identification Number (EIN), and other quality payment program information. This is also where your administrator may configure your Infobutton source URL to provide patient education materials. (Learn more here).

3. Confirm staff and users are up to date
Your next cleanup task is for an EHR administrator to review listed staff and users. Begin by selecting the Users tile from the Practice dashboard; or navigate to Settings (top right) and scroll down to Users under the header Practice settings. Here you can review listed users, asking:
- Who is currently on staff? Do they have an active login?
- Who needs to be marked “inactive” or no longer requires login capabilities?
From here, practice administrators may edit user profiles by clicking user names they would like to edit. This allows them to edit details such as name, degree, specialty, role, and login credentials. (Note: If a user has completed e-prescribing verification, their name cannot be edited within the EHR; if required, contact Customer service for further assistance.)
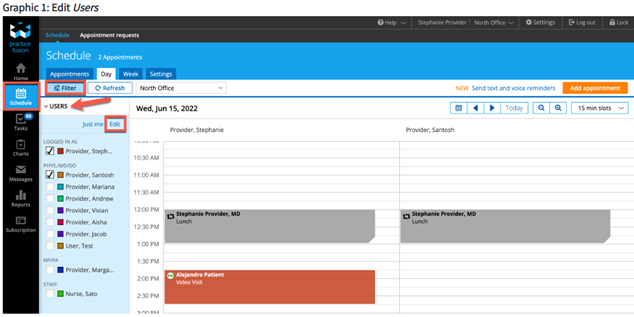
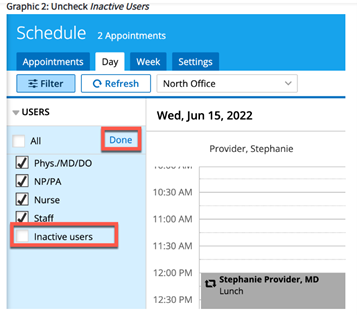
From this window, an administrator may also add or deactivate a user. Inactive users will only be viewable in the scheduler if you check the “inactive users” box. To hide inactive users, you may uncheck the Inactive users box and click Done.
4. Update Directory with current contact information
The Directory is a valuable resource that enables you to store a list of provider contacts so you can send them referrals and direct messages through your EHR. End-of-year an ideal time to review the Directory to make sure connections are current and contact information up to date.
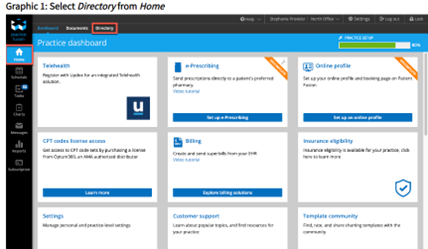
To access the Directory, click the Home icon in the left-hand navigation, then click the Directory tab at the top of the screen.
Within the Directory, you can search the Practice Fusion network for new contacts. Search results will show columns for information such as provider name, specialty (if provided), and contact information. Results also include current means of connection, or Network, which shows whether the provider is solely one of your personal connections or if they are also part of the Practice Fusion network.
You can filter results to show only My connections or Search Practice Fusion using the dropdown menu at the top left. If you select Search Practice Fusion, you can search the Practice Fusion network by name and/or specialty; the results will show providers closest to your location at the top of the list. 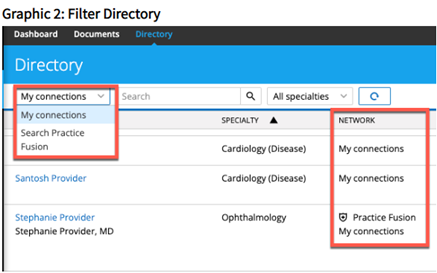
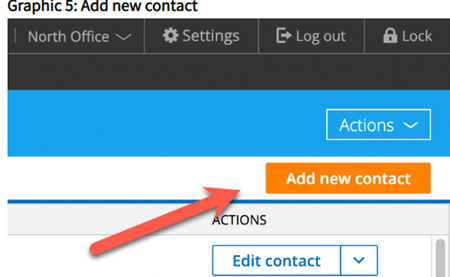
Once you’ve identified a provider to add, click Add to my network to add to your connections. You can also add a new contact by clicking the Add new contact button at top right of Directory, entering required information, and clicking Save.

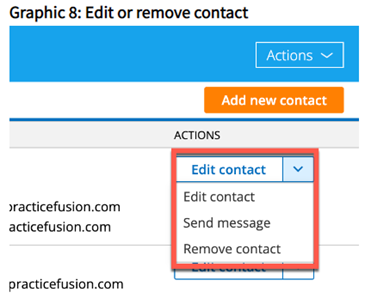
To remove contacts from your connections, click the drop-down menu beside the contact you wish to change and click Remove contact. To edit contacts, click Edit contact.
The key to keeping your EHR in top running condition
If you want your practice to run at optimum efficiency, it’s important to regularly schedule time to review your EHR’s settings and make sure everything is up to date. Ask questions such as:
- Have you integrated with one or more of Practice Fusion’s Billing Partners?
- Have you integrated with local laboratories and imaging centers, so you can receive lab results and radiology reports directly into your EHR?
- Have you verified that your practice’s contact information is up to date?
- Have you checked other practice details, such as the practice NPIs and EIN, to confirm that they contain the most current information?
End-of-year is a perfect time to “clean up” your EHR, to update information and optimize settings so you can operate more effectively. If you have questions or want to learn more about how Practice Fusion might help you better manage your practice, contact us.
