Your MIPS End-of-Year Check-in Guide

The traditional Merit-Based Incentive Payment System (MIPS) is used by the Centers for Medicare and Medicaid Services (CMS) to measure and reward clinicians in its quality payment incentive program, also known as the Quality Payment Program (QPP). With MIPS, clinicians are required to collect and report data for performance measures in 4 areas:
- Quality
- Promoting Interoperability
- Improvement activities
- Cost
Data collected in these categories are used to determine clinicians’ “final score,” which the U.S. Department of Health and Human Services (HHS) uses to assess MIPS-eligible clinicians and determine their annual payment adjustments to Medicare reimbursements. Thus, MIPS enables HHS to tie clinicians’ payments to quality and cost-efficient care, drive improvements in the healthcare processes, and reduce the cost of care.
However, 2022 brought several changes to overall MIPS scoring—which is why using MIPS successfully requires practices to ensure their electronic health record (EHR) systems are updated with the most current MIPS requirements. This guide lists 4 essential items to remember as you double-check your EHR to ensure it is set up to do the best possible job tracking MIPS performance measures for your practice.
MIPS Dashboard
1. Make sure the appropriate Performance Year is listed for your MIPS 2022 Dashboard
The first setting to confirm is that your MIPS 2022 Dashboard has the appropriate Performance Year selected.
The Practice Fusion EHR provides users with an easy-to-manage tool: the Practice Fusion MIPS Dashboard. This dashboard allows practices to track their progress in 3 of the 4 MIPS performance categories CMS requires for submission in a given reporting year. You can access the MIPS Dashboard under the Quality Reporting header under the main menu’s Reports section:
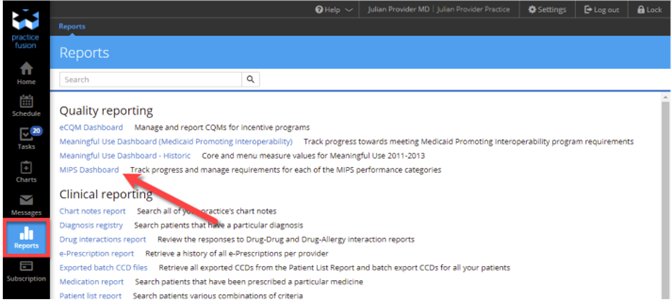
After you select MIPS Dashboard, check that the current performance year has been selected in the drop-down field at the top of the dashboard.
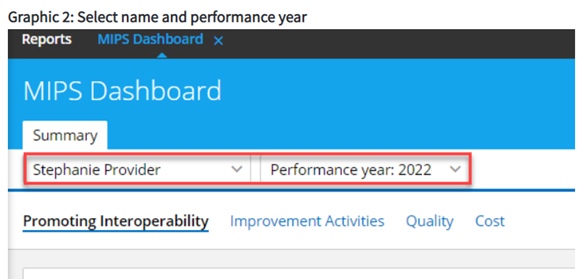
Once the dashboard has been set up with the correct performance year, you also need to select your desired reporting periods. To do this, click the Set up your reporting periods button or the MIPS settings link:

This will open a pop-up window where you can select reporting periods for each performance category. (The Promoting Interoperability and Improvement Activities categories can be set either to a full year or a custom 90-day reporting period; the Quality Dashboard category can only be set to a full year.) If you’re unsure which reporting period you prefer, you can select “Full year” at the outset, then adjust your reporting period at any later date in the calendar year.
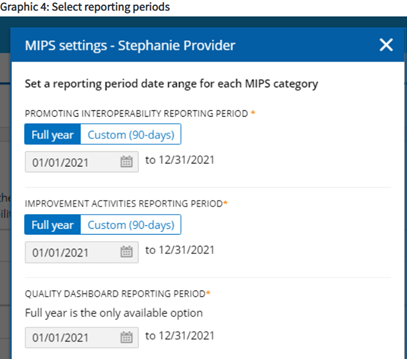
Note: When setting up any of the performance year Quality reporting dashboards for the first time, you will need to opt-in to run performance calculations for your practice. After you set up your reporting periods, it may take 48 hours for initial data to be displayed; MIPS Dashboard calculations will update every 48 hours thereafter.
If you notice that MIPS quality measure progress is not displayed for certain patients seen during the selected performance period, confirm that the relevant patient encounters have the correct encounter types selected and that they have been signed.
Encounters
2. Don’t forget to sign off on chart notes!
For your MIPS reporting to function correctly, it’s important to confirm that you have signed off on all your patient encounter notes. Only signed chart notes will be included when calculating quality measures in all categories.
In addition, only signed chart notes will provide the associated patients with electronic access to their health information via their Patient Portal. Providing patients access to their electronic healthcare information is an essential element of the Promoting Interoperability performance category, so unsigned chart notes can negatively impact multiple MIPS performance categories.
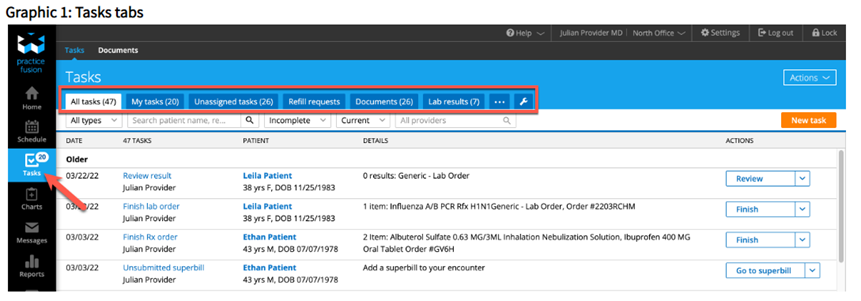
You can locate all unsigned encounters or chart notes using the Tasks tool in your Practice Fusion EHR. To view the Tasks section, click “Tasks” in the main menu:
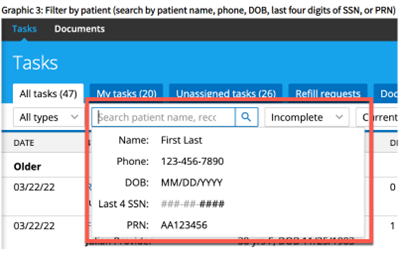
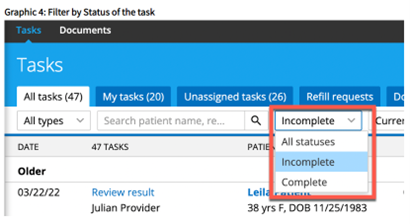
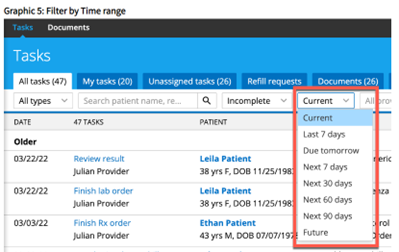
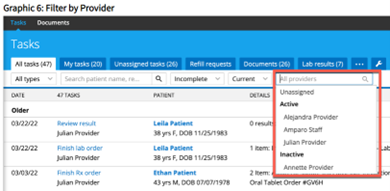
Within the Tasks section, tasks can be separated by category for easier viewing. (Each user in the practice can customize which Tasks tabs are visible and the order in which they appear.) Tasks can also be filtered by:
Patient (patient name, phone number, date of birth, last 4 social security number digits, or PRN)
Task status (all statuses, complete, or incomplete);
Time range; or Provider
Promoting Interoperability
3. Complete the Security Risk Analysis (SRA) before the end of the reporting period
Another key task to consider during your MIPS end-of-year check-in is whether you have completed the Security Risk Analysis (SRA), which all practices are required to complete before the end of the given reporting period.
The SRA is one of 4 required attestations under the Promoting Interoperability category. This security analysis includes the following:
- Assessment of the security of electronic Protected Health Information (ePHI);
- Assessment of the security of data created or maintained by Certified Electronic Health Record Technology (CEHRT);
- Implementation of any required security updates; and
- Correction of any identified security deficiencies (as part of your MIPS risk management process.)
Timing is important. The SRA must be conducted within the same calendar year as the MIPS performance period. It must include the entire MIPS performance period in scope and be unique for each MIPS performance period under consideration.
The Office of the National Coordinator for Health IT (ONC) collaborated with the HHS Office for Civil Rights to create a tool for performing this security analysis: the Security Risk Analysis tool. This tool helps practices conduct and document comprehensive assessments to help identify security risks. It also produces a report for use with MIPS audits. Be sure to keep documentation from the SRA process to prove that you have completed this requirement.
The ONC SRA tool can be downloaded from HealthIT.gov.
Once you have conducted this SRA (from outside the Practice Fusion EHR), you need to mark it as completed within Practice Fusion. These steps take you through the process:
Click on the Reports icon in the main menu. Then, under the Quality reporting section, select MIPS Dashboard.

On the MIPS Dashboard, select the MIPS Summary tab; find the Promoting Interoperability category; and click Required Attestations to open a modal window.
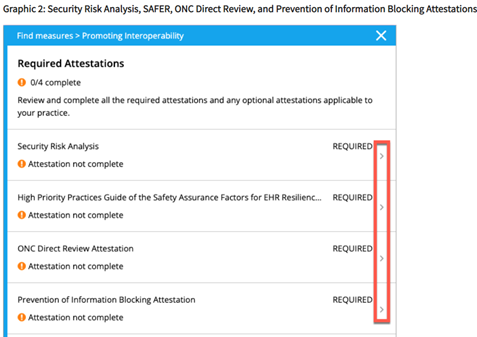
Within the modal, click the Security Risk Analysis attestation.
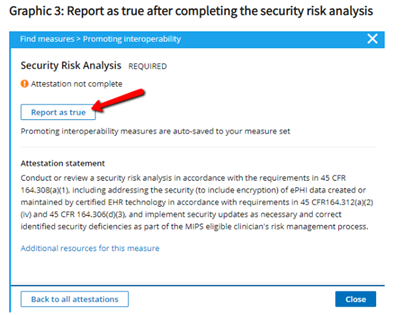
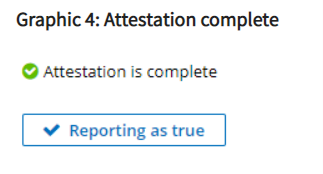
Within the Security Risk Analysis section, click Report as true; your attestation for SRA will be complete when marked by a green checkmark.
For additional support when completing your SRA, you may need to consult a qualified professional who can help you mitigate potential risks, identify potential areas for security improvements, and train staff to accommodate any security updates.
4. Register for appropriate public health and clinical data exchanges
Another MIPS Promoting Interoperability requirement to check is whether you have registered with your state immunization registry (a requirement for all providers who administer vaccinations). This registration—and connecting your registry account with your Practice Fusion account—are important for correctly calculating the Promoting Interoperability performance category of your MIPS data.
As part of CMS’ commitment to supporting public health agencies, both for long-term COVID-19 recovery and in preparation for future health threats, CMS now requires MIPS-eligible clinicians to report immunizations to their local immunization registries. This is a new reporting requirement for the MIPS Promoting Interoperability performance category in 2022.
You can check whether your Practice Fusion account is integrated with your state or public health registry by navigating to the EHR Settings, located at the top right of the EHR window. Within EHR Settings, select Immunization registry under the Registries and integrations header.
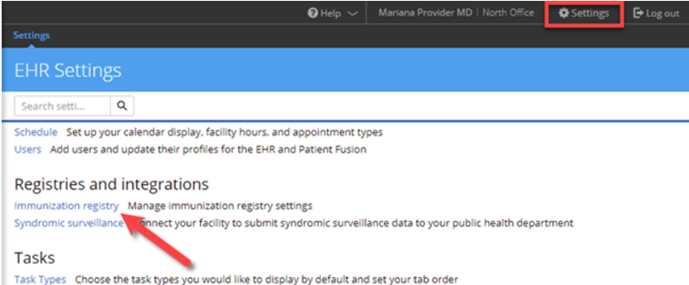
This will display any existing registry connections, plus instructions for setting up registry connections if they haven’t yet been established.
If you still need to set up your registry connection, your first step is to complete registration with the required registry. This is accomplished by:
- Navigating to your local registry’s website
- Completing the sign-up process, indicating that you are registering for an HL7 2.5.1 integration or electronic submission
- Once you sign up, the registry will provide you with account information. You will need this information to enter into Practice Fusion to initiate the connection process.
After completing your registration, the next step is to integrate your state registry with your Practice Fusion account. Practice Fusion helps providers to connect electronically with more than 50 state and local immunization registries and public health registries. (Click here to view a list of Practice Fusion-supported immunization registries.) You can add a registry connection in the Immunization registry section, located under the Registries and integrations header within the EHR Settings window, as described above.
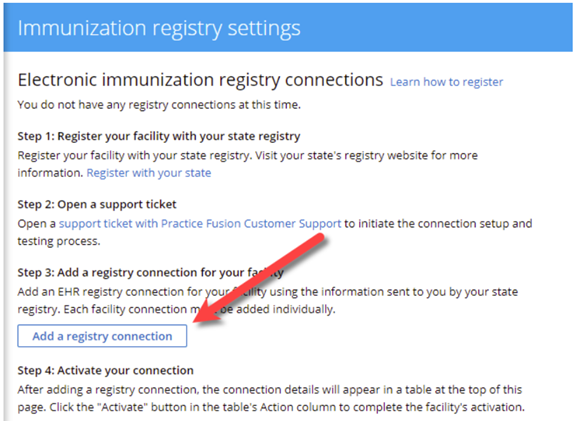
Once you have added your registry, open a Practice Fusion support ticket to initiate testing of the registry connection.
Importance of your MIPS end-of-year check in
To get the most out of your MIPS scoring, it is critical for you to set up your EHR and MIPS reporting system to make sure it includes all required information. As in the year comes to an end, you have limited time to make sure everything is set up correctly—but this checklist provides you with some key settings to double-check, settings that will help you make sure you are submitting the correct data, without missing any, to support your final MIPS score.
Contact us to learn more about Practice Fusion and how it can help you make the most of MIPS requirements.


